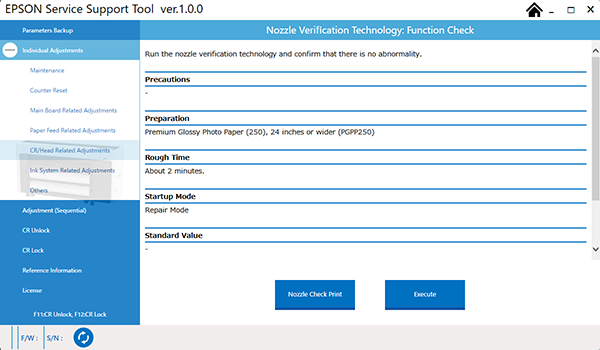
Nozzle Verification Technology Check
Required Tools
PGPP250 that is more than 16 inches (Premium Glossy Photo Paper(250))
Estimate Time
Approx. 5 min.
Startup Mode
Repair mode
Standard Values
---
Step
- Start the printer in repair mode. Turn the power on while touching [Screen Center], and keep pressing until the mode select screen is displayed. Touch the center of the panel to start repair mode.
Set the paper.
Start the Service Program, and select Nozzle Verification Technology Trouble Check.
Click the [Print] button to print the alignment check pattern.
Click [Execute] button to display results detected by the Nozzle Verification Technology.
 Check Point / チェックポイント
- Nozzle numbers of clogged nozzles are displayed. Count the nozzle numbers to know how many nozzles are clogging.
The above shows which nozzle row is which color.
SC-P8500D Series
Head 1 Ink Color Head 2 Ink Color 1A GY1 2A GY3 1B Y1 2B Y3 1C PK1 2C PK3 1D M1 2D M3 1E C1 2E C3 1F MK1 2F MK3 1G MK2 2G MK4 1H C2 2H C4 1I M2 2I M4 1J PK2 2J PK4 1K Y2 2K Y4 1L GY2 2L GY4 SC-P7700D Series
Head 1 Ink Color Head 2 Ink Color 1A R1 2A R3 1B Y1 2B Y3 1C PK1 2C PK3 1D M1 2D M3 1E C1 2E C3 1F MK1 2F MK3 1G MK2 2G MK4 1H C2 2H C4 1I M2 2I M4 1J PK2 2J PK4 1K Y2 2K Y4 1L R2 2L R4 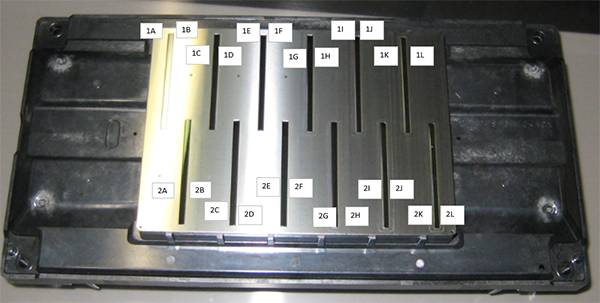
- Respond as follows in accordance with the displayed results.
- When “Success” is displayed.
Check that there is no nozzle clogging by checking the printed check patterns.
 If there is no nozzle clogging, end the check.If there is any nozzle clogging, go to Step 6.
 When "Nozzle clogging detected" is displayed.
Go to Step 6.
Run the cleaning until clogging is cleared, and then perform this check again.
- If “Success” is still not displayed, run the Nozzle Verification Technology: Noise Check and the Rank Classification in that order, and then run this check again. If this is still unsuccessful, replace the Print Head.